.svg)
Beginning in FileCloud 23.251, admins can import FileCloud groups and users from Okta, Google, and Azure SSO providers. In the future, importing groups and users from additional providers may be available.
Systems that authenticate users with Okta, Google, or Azure SSO can also import the users and their groups from the SSO provider. This requires integration of FileCloud and the SSO provider, separate from the configuration of the SSO provider(s) on the SSO settings pageor through the idpconfig file.
To set up the integration of the SSO provider and FileCloud for group and user import:
-
Step 1: Set up FileCloud to integrate with the SSO provider for group/user import in the SSO provider's application.
-
Step 2: Set up the SSO provider to integrate with FileCloud for group/user import in the FileCloud admin portal.
Step 1: Set up FileCloud to integrate with the SSO provider in the SSO provider's application:
Currently, the SSO providers available for integration with FileCloud for group/user import are Okta, Google, and Azure.
-
Okta: Set Up FileCloud Integration for SSO Group/User Import
-
Azure: Set up FileCloud Integration for SSO Group/User Import
-
Google: Set up FileCloud Integration for SSO Group/User Import.
Step 2: Set up the SSO provider for importing groups and users into FileCloud:
-
Open the SSO API page.
-
In the FileCloud admin portal's left navigation bar, scroll down and click Settings. Then, on the Settings navigation page, click Third Party Integrations

-
In the inner navigation bar on the left of the Third Party Integrations page, expand the Third Party Integrations menu, and click SSO API, as shown below.
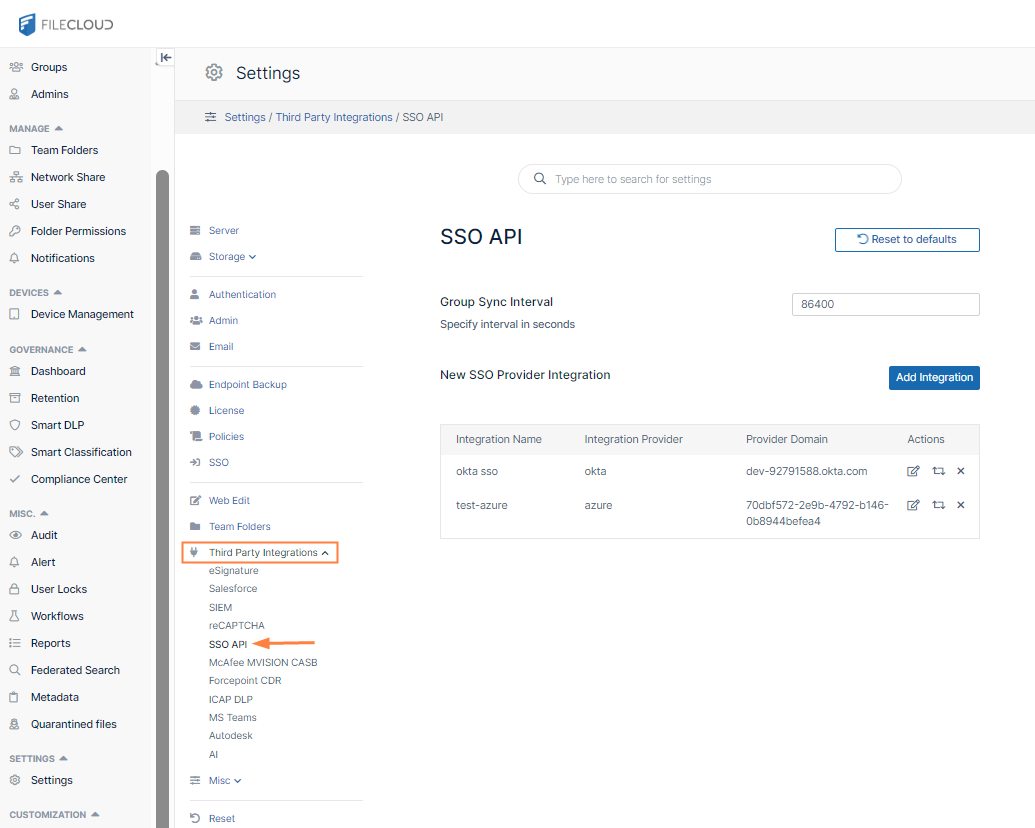
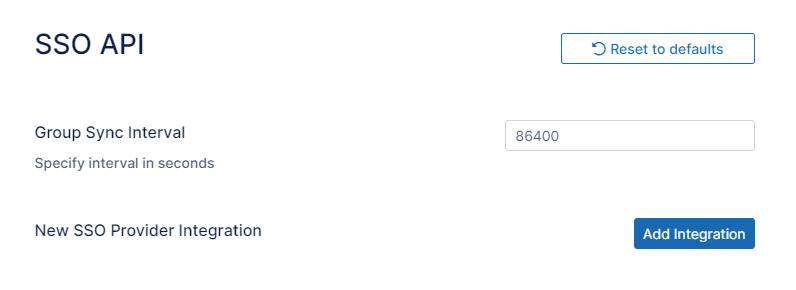
The SSO API settings page opens.
-
-
By default, the group sync is set to occur every 86400 seconds (once a day).
To change how often group sync occurs, modify the value of Group Sync Interval. Specify the value in seconds. -
Click Add Integration.
The New SSO Integration dialog box opens. -
Enter a name for the integration and click the button for the corresponding SSO provider:
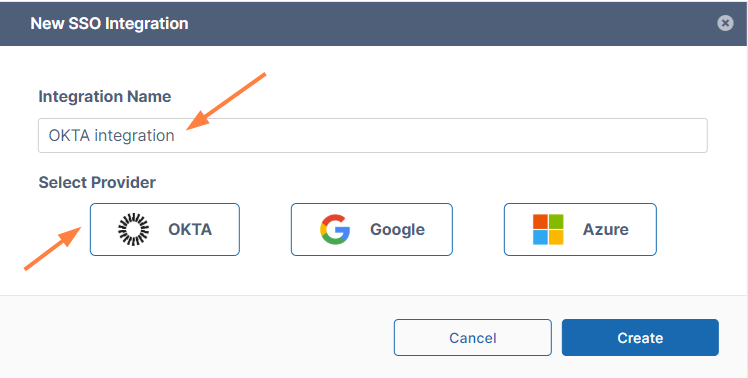
The dialog box expands.
Enter the integration values for the specific SSO provider:
OKTA
Enter integration values for Okta
-
When you click the OKTA button under Select Provider, the following settings appear. Enter the value for each as indicated in the table below.
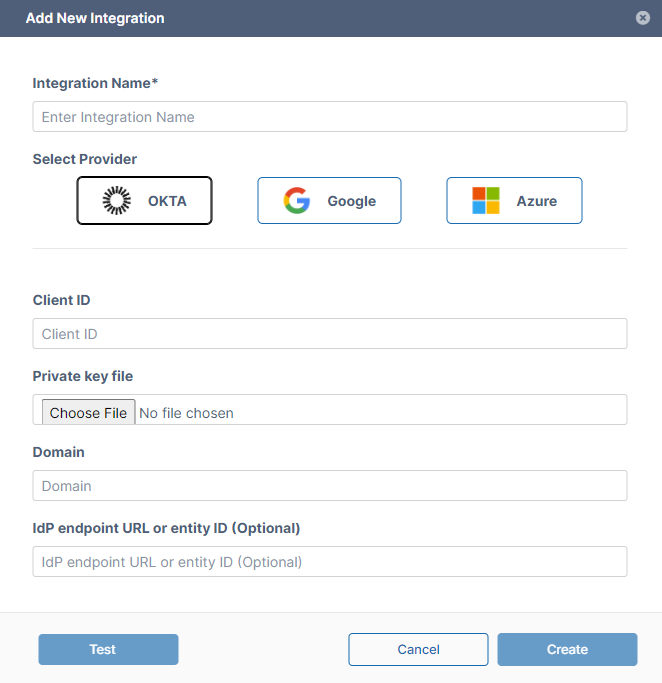
Integration Name
You may enter any name.
Client ID
Enter the Client ID created for you when you set up the integration with FileCloud in Okta. You may copy it from the Okta Admin Console's listing for the application and paste it into the field. The following image shows where it appears in the Okta Admin Console.
Private key file
Choose the .pem file that you saved your private key in. You may have created the file and saved it when you were setting up the integration with FileCloud in Okta.
Domain
Enter the domain that Okta created for your user in Okta when you set up the integration with FileCloud in Okta. You may copy it from the Okta Admin Console's User drop-down box and paste it into the field. The following image shows where it appears in the Okta Admin Console.
IdP endpoint URL or entity ID (Optional)
Enter if you are using multiple IdP's. Enter the value in the field IdP endpoint URL or entity ID from the FileCloud SSO settings.
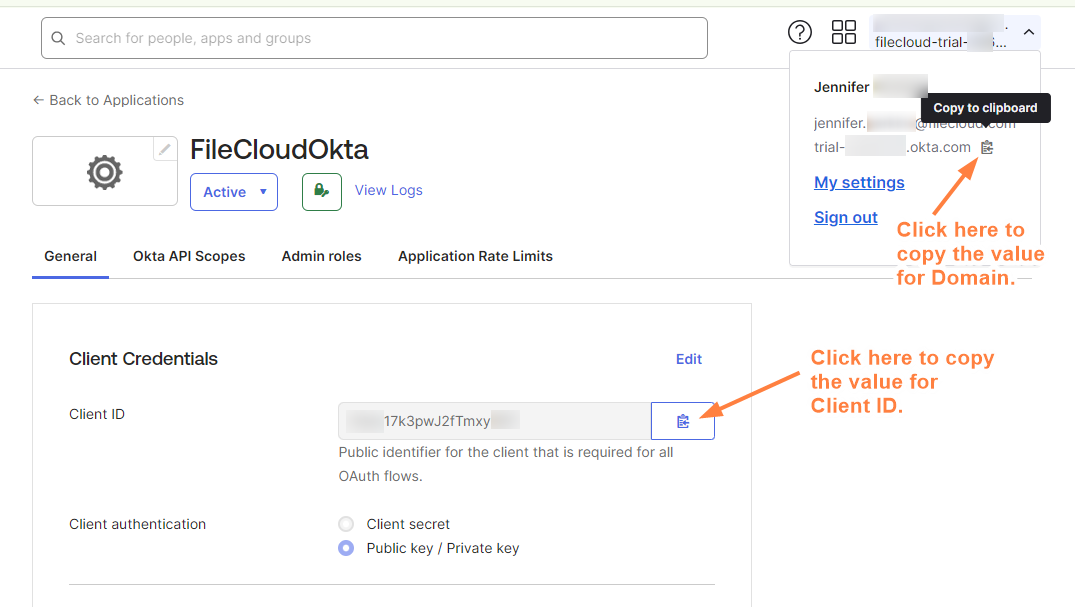
Location of values for FileCloud fields in Okta Admin Console
-
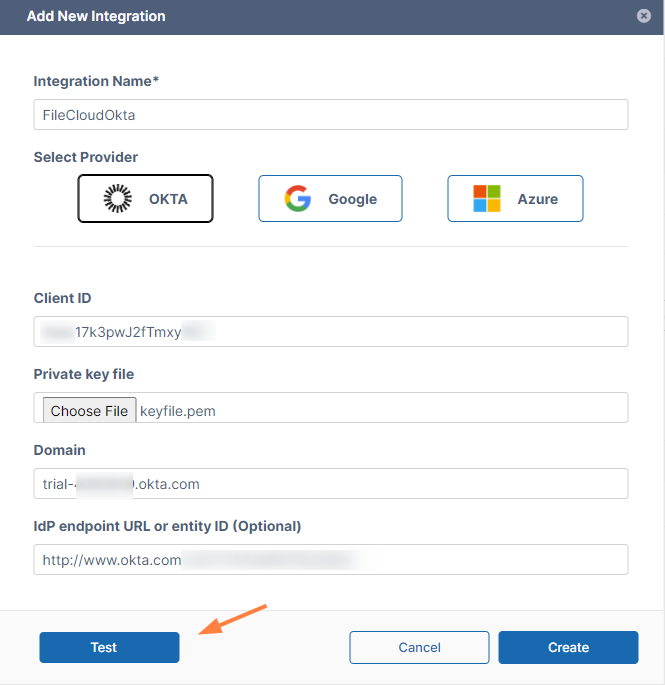
Once you have filled in the fields, click Test to make sure your integration works.
-
If the test is successful, click Create.
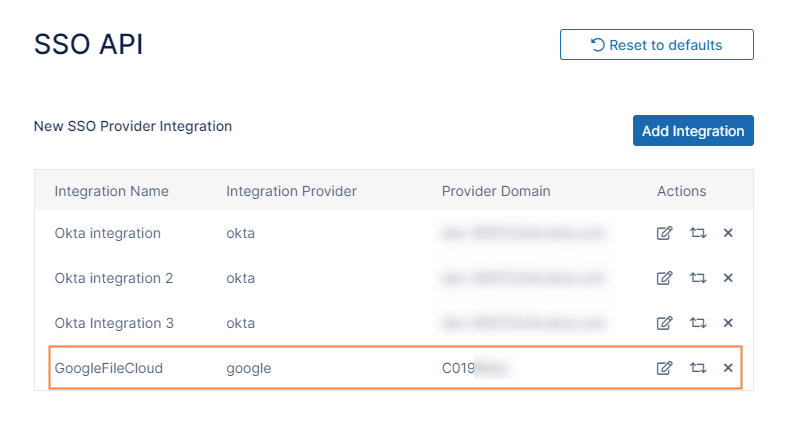
The integration is added to the list of SSO integrations: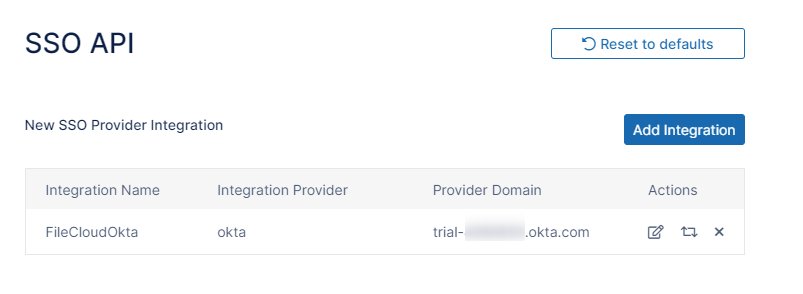
-
By default built-in OKTA groups are not listed when you import groups from OKTA.
To list built-in OKTA groups, in cloudconfig.php, add the setting define('TONIDOCLOUD_ADMIN_SSO_API_LIST_ALL_GROUPS',1); OKTA groups:
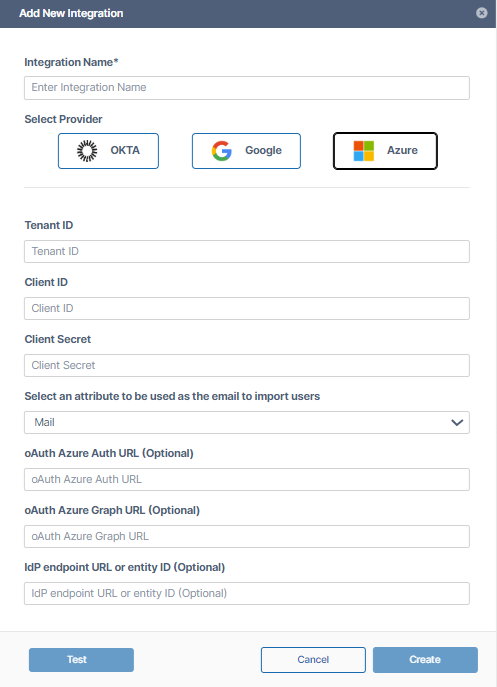
Azure
Enter integration values for Azure
-
When you click the Azure button under Select Provider, the following settings appear. Enter the value for each as indicated in the table below.
|
Integration Name |
You may enter any name. |
|
Tenant ID |
Enter the Directory (tenant) ID that you saved from the Overview page when you set up your integration with FileCloud in Azure, or copy it directly from that page in the Azure portal and paste it into the Tenant ID field. The first of the images below shows where it appears in the Azure portal. |
|
Client Secret |
Enter the Value that you saved from the Certificates & secrets page when you set up your integration with FileCloud in Azure, or copy it directly from that page in the Azure portal and paste it into the Client Secret field. The second of the images below shows where it appears in the Azure portal. |
|
Client ID |
Enter the Application (client) ID that you saved from the Overview page when you set up your integration with FileCloud in Azure, or copy it directly from that page in the Azure portal and paste it into the Client ID field. The first of the images below shows where it appears in the Azure portal. |
|
Select an attribute to be used as the email to import users |
Select the attribute that is used to authenticate the user in SSO. Options are Mail or userPrincipalName. |
|
oAuth Azure Auth URL (Optional) |
In general, this is for use by Azure GovCloud users. Enter the URL of your Azure authorization domain. |
|
oAuth Azure Graph URL (Optional) |
In general, this is for use by Azure GovCloud users. Enter the URL of your Azure graph domain. |
|
IdP endpoint URL or entity ID (Optional) |
Enter if you are using multiple IdP's. Enter the value in the field IdP endpoint URL or entity ID from the FileCloud SSO settings. |


-
Once you have filled in the fields, click Test to make sure your integration works.
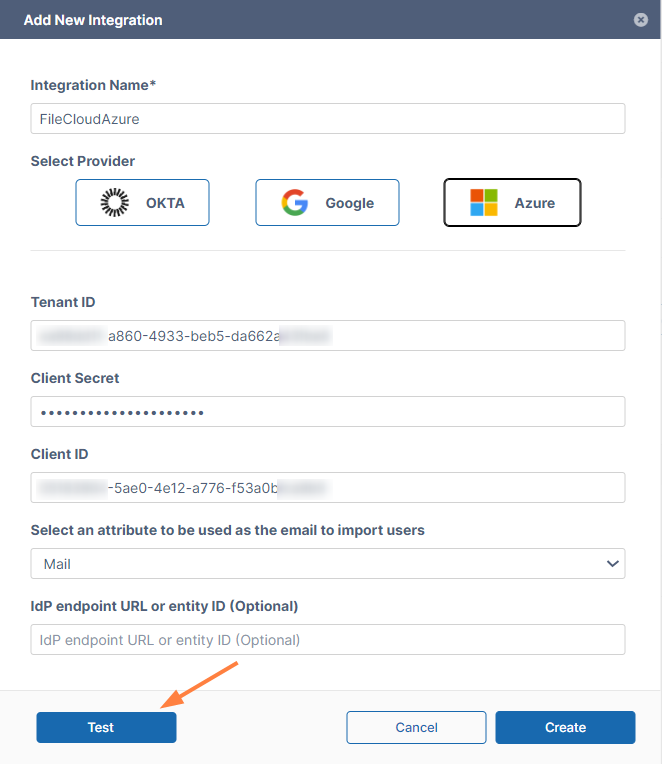
-
If the test is successful, click Create.
The integration is added to the list of SSO integrations: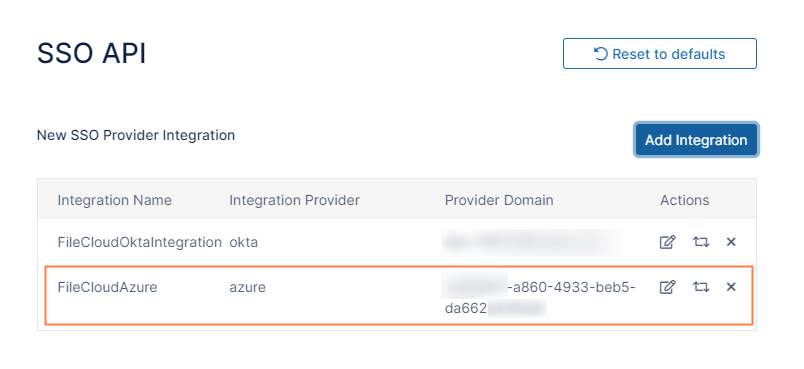
-
By default built-in Azure groups are not listed when you import groups from Azure SSO.
For help listing built-in Azure groups, please Contact FileCloud Support.
To list built-in Azure groups:
-
Open the configuration file at:
Windows: xampp/htdocs/config/cloudconfig.php
Linux: /var/www/html/config/cloudconfig.php -
Add the setting:
define('TONIDOCLOUD_ADMIN_SSO_API_LIST_ALL_GROUPS',1);
Enter integration values for Google
-
When you click the Google button under Select Provider, the following settings appear. Enter the value for each as indicated in the table below.
Integration Name
You may enter any name.
Customer ID
Find the value that you saved for EntityID in the Google admin portal and copy the value after idpid= at the end into Customer ID. For example, if the value you saved was:
https://accounts.google.com/o/saml2?idpid=ABC123DEF, enter ABC123DEF into Customer ID.
The image below shows where it appears in the Google admin portal.Super admin e-mail address
The e-mail address of the superadmin who added the integration of FileCloud and Google SSO in the Google admin portal and the Google Cloud Console.
Private key file
The json file that was created in the Google Cloud Console.
IdP endpoint URL or entity ID
If you are using multiple IdP's, enter the IdP endpoint URL or entity ID from the FileCloud SSO settings.
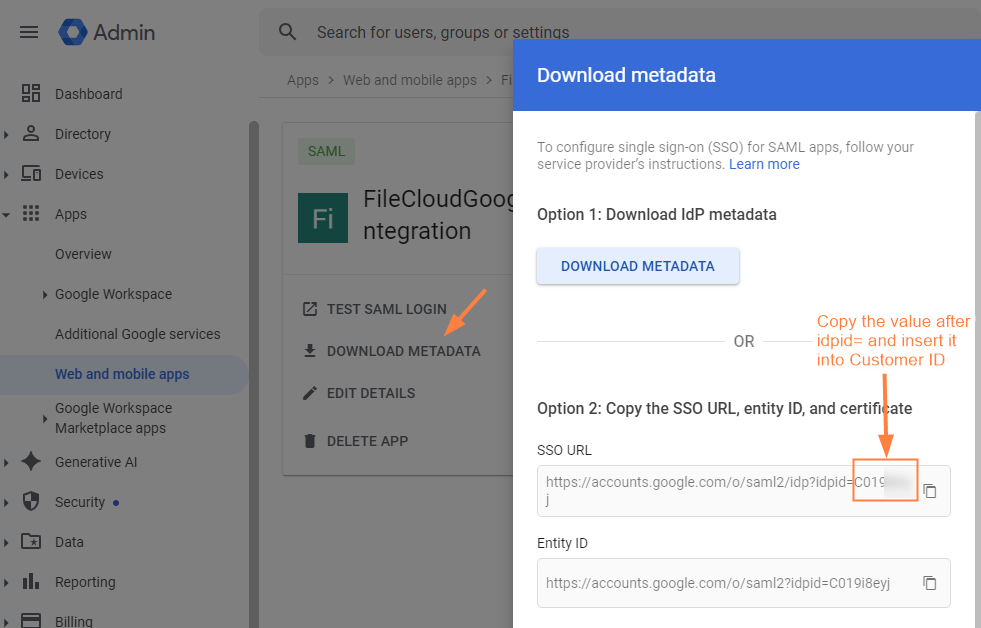
Location of the Customer ID value in the Google Admin Portal.
-
Once you have filled in the fields, click Test to make sure your integration works.
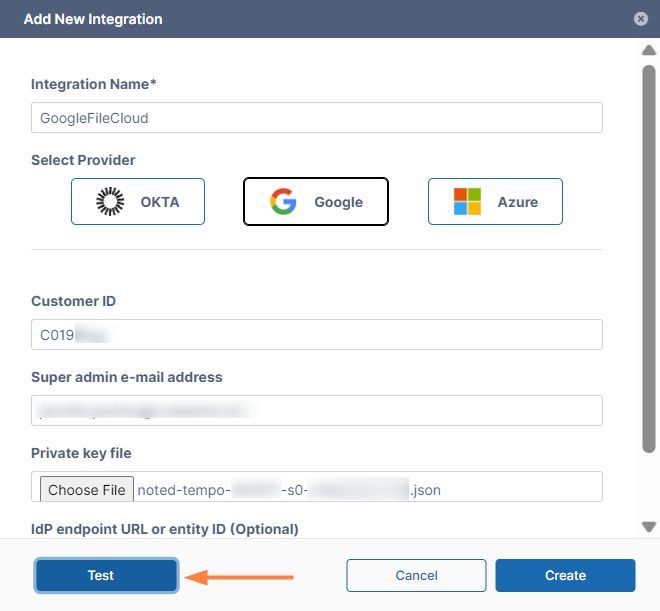
-
If the test is successful, click Create.
The integration is added to the list of SSO integrations: