.svg)
The FileCloud Office Add-In is the recommended tool for adding FileCloud as a place because it provides a richer experience.
-
It supports more versions of Microsoft Office and allows you to configure some of the associated settings.
-
Installing the FileCloud Add-In allows you to work from your own workspace using your own software.
Installing the Office Add-In
To install the FileCloud Office Add-In:
2. Install the Add-In
To install the FileCloud Office Add-In:
-
Download and install the FileCloud Office Add-In through the link in your FileCloud customer portal.
-
Accept any security warning and continue installation.
-
Once the installation is complete, restart any open MS Office applications, such as Word or Excel.
Once installed, FileCloud will appear as a Ribbon on the main window with the following buttons:

-
Open (from FileCloud)
-
Save (to FileCloud)
-
Save As (to a new name or location in FileCloud)
-
Settings (specify login credentials, default folders, and any proxy settings)
3. Enter Your Login Credentials
The login credentials, when set, are encrypted and stored securely.
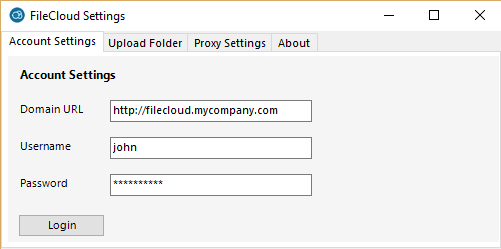
To enter your FileCloud credentials:
-
In your MS Office application, on the FileCloud menu, click the Settings icon.
-
Click the Account Settings tab.
-
In Domain URL, enter the FileCloud URL.
-
In Username, enter the name you use to log in to FileCloud.
-
In Password, enter the string of numbers, letters and characters you use to log in to FileCloud.
-
Click Login.
5. Configure Proxy Settings
If your network uses a proxy server or you want the FileCloud Office Add-In to use a proxy server, you can configure proxy settings.
To get the Proxy Server Address, Port, Username and Password to connect to your proxy server, contact your network administrator.
To configure proxy settings:
-
In your MS Office application, on the FileCloud menu, click the Settings icon.
-
Click the Proxy Settings tab.
Using the Office Add-In
To Use the Add-In Options:
-
To open a file, in your MS Office application, on the FileCloud menu, click the Open icon.
-
To Save a file to FileCloud, in your MS Office application, on the FileCloud menu, click the Save icon.
If the file was originally opened from FileCloud, the file will be automatically saved to that corresponding folder in FileCloud.
-
To save the file to a different location or with a different name, in your MS Office application, on the FileCloud menu, click the Save As icon.