.svg)
The beta version of the Network Share Scanner with services for Windows accessible from the FileCloud Control Panel is available in FileCloud 23.261 and later.
The new FileCloud Network Share Scanner, a more efficient indexer service than FileCloud Helper, monitors file system events on LAN-based Network Folders, enabling use of advanced FileCloud features with files in Network Folders including:
-
Content search
-
User workflows
-
Content Disarm and Reconstruction (CDR)
-
Antivirus integration
-
Metadata rules
-
Data Loss Prevention (DLP)
-
Content Classification Engine (CCE)
Once you are running the Network Share Scanner, these features will function successfully when you specify network share paths using the root external.
The Network Share Scanner is available on both Linux and Windows systems.
Start/Manage Network Share Scanner
Note that on Linux, you must install the Network Share Scanner, but it Windows it is already installed.
Windows
To start the Network Share Scanner in Windows:
-
Open the FileCloud Control Panel.
-
Click Config next to Message Queue:

The default.json file opens. By default, the field "event_api_workers_count" is set to 0. To process the eventapi queue, increase it. The number you increase it to depends on the size of your network shares; increasing it to 2 to 4 is typical, but you may go as high as 10.
-
Enable the Network Share Scanner:
-
Open the cloudconfig file at:
C:\xampp\htdocs\config\cloudconfig.php -
Add the setting:
define("TONIDOCLOUD_EVAPI_ENABLED", true);
-
-
Restart Message Queue.
-
In the FileCloud Control Panel, click Install for the services:
Events API (Beta)
Network Share Scanner (Beta)
Etcd (Beta) -
In the FileCloud Control Panel start the following services:
Memcache
Etcd (Beta) -
After Memcache and Etcd (Beta) have started, start:
Events API (Beta)
Network Share Scanner (Beta)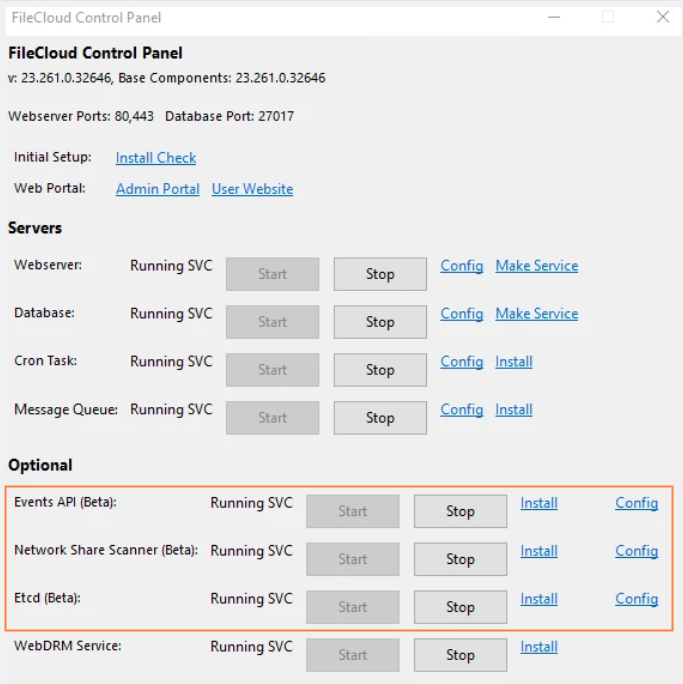
-
For each network share that you want to be monitored by the Network Share Scanner, in the Network Folder Details for the folder, check Realtime Index for Automatic Sync and Search.
Note: After changing this flag, it can take up to 1 minute for this feature to detect the new network and start monitoring it.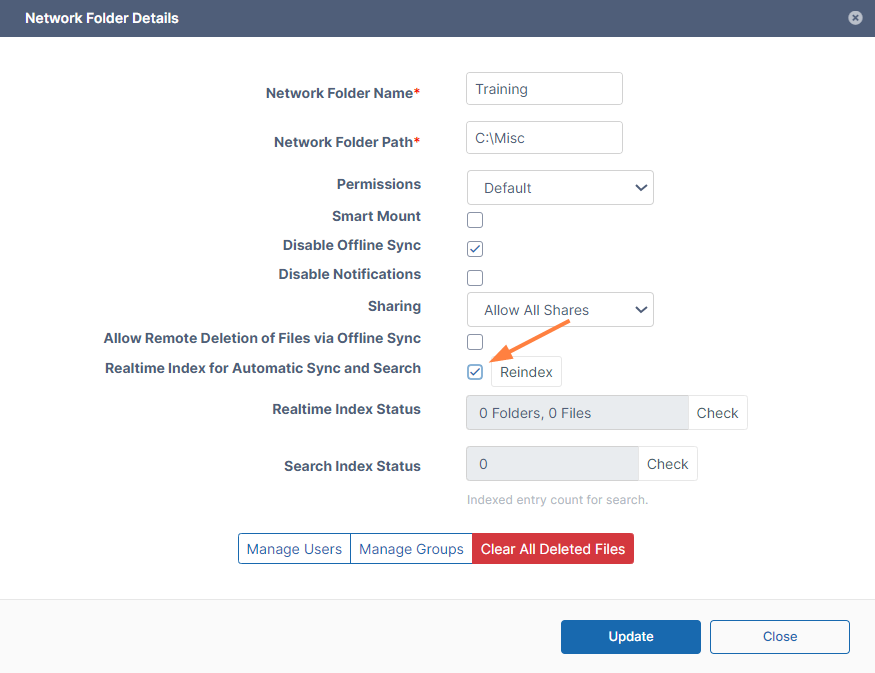
Linux
-
Open the file /var/www/html/src/Scripts/default.json
By default, the field "event_api_workers_count" is set to 0. To process the eventapi queue, increase it. The number you increase it to depends on the size of your network shares; increasing it to 2 to 4 is typical, but you may go as high as 10. -
Enable the Network Share Scanner:
-
Open the cloudconfig file at:
/var/www/html/config/cloudconfig.php -
Add the setting:
define("TONIDOCLOUD_EVAPI_ENABLED", true);
-
-
Restart the message queue service.
-
Install the Network Share Scanner in Linux:
filecloudcp -e → install EventAPI
filecloud -n → installs network share scanner
The services start automatically after you install them.
-
For each network share that you want to be monitored by the Network Share Scanner, in the Network Folder Details for the folder, check Realtime Index for Automatic Sync and Search.
Note: After changing this flag, it can take up to 1 minute for this feature to detect the new network and start monitoring it.
To manage the Network Share Scanner in Linux:
Use a regular service manager to manage the services. For example, to stop the service, enter:
systemctl stop fceventapisystemctl
systemctl stop fcnetworksharescanner
Log management
The Network Share Scanner includes several settings for managing your log output.
To manage your logs:
-
In C:\xampp\eventsapi, open networker-config.yaml.
You can change your log settings in the section that appears as:log: stdout: false level: info path: logs filename: log.json
The settings options are shown in the following table:
|
Setting |
Options |
|
stdout |
false (default) - do not print logs to command line interface
|
|
level |
info (default)
|
|
path |
logs (default)
|
|
filename |
log.json (default)
|
-
Restart FCC-NSS_Maestro.exe for any changes to take effect.